Showing posts with label Facebook. Show all posts

Facebook Like Box for Blogger

07:25 Add Comment
Facebook like box is a very important facebook widget for every blog. It helps bloggers to increase their blog traffic. Every blogger should keep this widget in their blog. Facebook is a very large social sharing website and it has countless visitors. You can easily increase your blog traffic by telling your friends and other visitors about your blog. A blogger should must keep in his mind that his blog is nothing without facebook. All blogs in the world are closely associated with facebook.

Facebook gives many options to increase your blog traffic. A like box is also in these options. Facebook like box is a type of sharing widget which help you to enhance your visitors and if a one facebook visitor like your blog then your blog will look on his wall and his hundreds of friends will also take a look onto your blog and that,s why your blog traffic will be increasing in minutes. Below is method to place facebook like box to your blog .


Adding Facebook Like Box to Your Blog


1. Go to this link
2. Type your Facebook fan page url in Text field & set your settings like below picture.


3. Click on Get Code Button.
4. You have three options to copy the code. You will have to click on Iframe Tab and copy the whole code.


5. Now go to Blogger---> Dashboard ---> Layout & click on Add a Gadget.
6. Choose Html/Java Script Widget, set your title and paste Like Box copied code in text field.
7. Now you can see a beautiful Facebook Like Box on your blogger.

Disable Facebook Notifications for Email

08:05 Add Comment
Facebook Email logo
Today i come here to tell you an article about facebook. Facebook is a largest social sharing website which has made by two brothers. There are many things in facebook which we like and there are also many thing which a man don,t like. When we join facebook and post on our wall then a notification have been send to our Email. We make our Email Id for our personal use and after joining facebook, when we open our email, there are many many notifications  which are caused to increase our tension. In this  tutorial, You will know that how to disable this type of  facebook notifications from our email. Here is a full article for knowing such a thing


Disable Facebook Notifications from Email


1. Login to your facebook account.
2. Go to Account Settings by clicking on Half Arrow icon.

Facebook Settings

 3. Click on Notifications. And then you can set your notifications according to your wish. You can disable email notifications by clicking on Message icon. See below picture for help.

Picture for fb settings

                             If you have any problem about above article then ask in comments.

Remove Facebook Timeline on Google Chrome

08:32 Add Comment
Do you know that how to remove facebook Timeline? Many of us don,t know that how to remove facebook Timeline. So the answer is "No". Sometimes, many people says that their facebook profile has automatically changed into Timeline. Their are lot of things we talk about Timeline. It is fact that i hate Timeline and i am the one who can say that his Timeline has automatically added to his profile. There are very very few things to remove Timeline. Facebook don,t give any option to remove Timeline. I only know that how to remove it while browsing on Google Chrome.

Google Chrome gives us many facilities for such things. It has many Plugins, Extensions and Applications. All Applications are very useful and use in many problems.Below are some hints for removing Timeline.


Removing Timeline


1.Go to http://google.com.pk
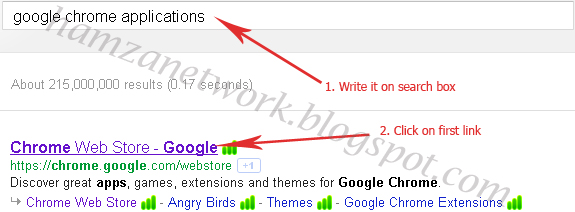
2.Type Google Chrome Applications in search box.
3.Click on First search result on Google


4.Write Timeline Remove in Chrome Web Store search box.


5.Then click on Add to Chrome at first Applications who,s name is Timeline Remove


6.When you will click on Add To Chrome then the application will automatically save in Google Chrome. If you will open any facebook profile then timeline will not be visible and profile will look simple.


Result


Before adding Extension, Hamza Network facebook profile look like below picture.


After adding Extension, Hamza Network the facebook profile look like below picture.


                                  Ask in comments if you have any problem about this topic.

Add Facebook Like and Send Buttons Under Posts in Blogger

05:05 Add Comment
Hello everybody! Today i will tell you about Facebook Like and Send button. I will also tell you that how to add Facebook Like and Send buttons to your Blog only under posts. Facebook as a way to "give positive feedback and connect with things you care about," users can "like" status updates, comments, photos, and links posted by their friends, as well as adverts, by clicking the "Like" button at the bottom of the content. This makes the content appear in their friends' News feeds.
The "Like Button" is also available for use on websites outside Facebook: "When the user clicks the Like button on a site, a story appears in the user's friends' News Feed with a link back to the website
." At the same time when any visitor, including non Facebook members and logged out users, visit a site with the Like Button, their presence on the site is recorded by Facebook. Now i will teach you that How to add Like and Send buttons below post titles under the posts. Below are some steps for doing that.

Warning :Before you apply any changes in your Blog template, I encourage you to backup your Template by clicking Download Full Template 


Adding buttons to your Blog


   Login to Blogger account.
   Go to Dashboard--->Design--->Edit Html.
   Check Expand Widegets Elements.
   Now find below code.

       <data:post.body/>

  Paste the following code Before it

 <!-- Facebook Like+Send button Start HamzaNetwork --> <script src='http://connect.facebook.net/en_US/all.js#xfbml=1' type='text/javascript'/><fb:like action='like'     colorscheme='light' expr:href='data:post.url' font='' layout='button_count' send='true' show_faces='false'     width='450'/>             <!-- Facebook Like+Send button End HamzaNetwork -->

   After pasting this code, Facebook Like and Send button will appear under the post titles on the Home page of your blog. If you want to keep Buttons on First or Home page then click on Save template.


Appear buttons only under posts


  � If you want to make the buttons only appear inside your posts and not on your blog pages,
  put the following codes above and after the button codes.

        <b:if cond='data:blog.pageType == &quot;item&quot;'>
                    Button code Here
         </b:if>    

 Now you have Done.


Change Like to Recommended


� Find the following part in button code.


  action='like'

 � Change it to

  action='Recommended'  


Hide who Liked and Show only the Numbers of Likes


� Find the following part in button code.

 layout='Standard'

� Change it with

 layout='button_count'


Change Style of buttons


 � If you want to change style from light to dark then find the following code

 colorscheme='light
 � Change it with
  colorscheme='dark

   Now you have done all customization. If you want to ask anything about this Topic then ask in comments.