Showing posts with label Google. Show all posts

How to Create Google Custom Search Engine for Blogger

17:59 Add Comment
When we search any thing on internet then we go to Google search before doing anything. Now, a conservative estimate would be that there is no so much internet without Google. Every blogger has a search engine in his blog for his blog post,s searching. There are unless templates for blogger and they have their own custom search engines. These search engines show limited result of search and they are not very good. Google Custom Search Engines (CSE) are very efficient and they show most important posts and data of our blog. CSE increase number of pageviews  of your blog because your blog visitor is kept involved in reading more articles of your blog.


Create A Google Custom Search Engine


1. Go to Google Custom Search official page.
2. Click on Create Custom Search Engine Button.


3. Now set your settings as show in below picture.


4. Now click on Next button and choose the style of your custom search engine.You can click on Customize button to change the style and look of your search engine.


5. Now click the next button and then click Look and Feel on the next page.


6. you will see three layout options i.e Full-width, Compact and Two-column. See the picture below.


If you want to add search box below post then choose Full-width.
If you want to add your search box on sidebar then choose Compact.
If you want to display your search box to sidebar and show search results above the post title then choose Two column. 

Finally click on Save & Get Code and copy the code which Google will give.

Add Custom Search Engine to Blogger Posts


If you want to add your search engine below post then follow the below method:

1. Go to Blogger --> Template --> Edit Html and check Expand Widgets Elements.
2. Now search the below code
<data:post.body>
3. Now just below it paste the Custom Search Engine copied code(Full-Width)
4. Save your Template and you will see that Custom Search Engine is appearing just below blog posts.


Add Custom Search Engine to Blogger Sidebar


1. Go to Blogger --> Layout --> Add a Gadget(Sidebar), choose HTML Java Script Widget and paste the copied code in it.(Compact or Two Column)
2. Hit save and you have done everything. You will see a Google Custom Search Box to your Blogger Sidebar.

                      If you are facing any hesitation about this topic then comment me below.

Submit your Blogger Sitemap to Google

00:55 Add Comment
Google is largest search engine in the world and no any other search engine can compete it. Every internet  user has to deal with it. People were use Yahoo, MSN and Bing first but with the passage of time, Google has become more popular and more reliable due to his easiness. Every blogger and any site owner think about Google search after creating his/her site. All the people in the world know much about Google and they find their problems on Google Search. Every blogger has to add his/her blog to Google otherwise his/her blogger will not be popular and blog traffic will always very low. Some people like to search in Yahoo, Bing, Msn, and Ask because they like the style of these search engines but Google provide easy and reliable search results. So, most of people use Google. It is very important to add your blog/site to Google so that your blog traffic will increase in days. Below is a full article for adding your blog/site to Google.


Adding Blogger/Website to Google


1. Go to Google Webmaster Tools and Click Sign in to Webmaster Tools.


2. Now Sign in with your Gmail account.


3. When you have signed in, your dashboard will look in front of you. You have to click on Add a Site button placed on top-right of your dashboard.


4. Now type your Blog/Site url in text field and click on continue.


5. Now Google will ask you to verify your blog/site ownership. Google will give your 3 or 4 options to verify your site ownership. Click on Alternate Methods, choose HTML Tag and copy the meta tag code.


6. Now Login to Blogger ---> Dashboard --->Template ---> Edit HTML and find the following code, 
<head>
paste the copied Meta Tag code just below it and click on verify button.

7. After verification, Click on Add/Test A Sitemap button placed on the top right of your dashboard page.


8. After clicking on Add a Sitemap, it will ask you to enter the sitemap of your blog. The address of your blog will be already there and you just have to add the remaining part which is following:
feeds/posts/default?max-result=100
However the code will look like this:
http://your-blog-url/feeds/posts/default?max-result=100
9. If your blog has more than hundred posts then you can change the red code with the following code:
feeds/posts/default?max-result=200
10. you can change the red code according to the number of your posts in blogger but it always should be in hundreds.

Last thing i want to tell you that Google will take some time (24 hours) to index the contents of your sitemap.
                         Ask in comments if you have any problem about this topic.

Google Chrome-Offline Installer

19:35 Add Comment
Google Chrome
Salam to all my dear friends. I come here to tell you a tip about Google Chrome. Google Chrome is largest browser in the  world. Most of people use chrome for browsing. It is very fast and efficient browser and that,s why i use Google Chrome. I want to tell you an interesting thing that there is no compatible disk of Google Chrome available in market. Most of people ask me that how to install Google Chrome offline. You all know that Google Chrome does not install offline and to install Google Chrome, you have to an internet connection.Now i have a solution for this problem. Today, i will tell you that how to install Google Chrome web browser offline. It is very simple and you will get it in seconds.


Install Google Chrome Offline


1. Go to this link.
2. I prefer you to download Google Chrome from first US-Dev 20 server. Size of your downloaded file will 26 MB.

Softpedia Mirrors

3. After Downloading, Double Click on Installation icon. When you will double click on icon, nothing will happen and your Chrome browser will automatically install after few seconds and it,s shortcut will show on your desktop.

Google Chrome

4. You have done everything.

Add Blogger Posts to Google Plus Page

23:30 Add Comment
This is my first article about Google Plus. We all know that Blogger is a very big platform for Blogging, We also know that there are many things to customize and popular our Blog which are designed by Google or any other developer. Google Plus is one of them which is cause to popular our Blog. G+ is very  useful thing for Bloggers and other site makers.Today i will tell you that how to add your Blogger Posts to Google Plus page. If you add your Blogger posts to G+ then your site ranking will be increased. Your friends will know much more about your Blog. Your Blogger posts will popular and more precious.


Add Blogger Posts to Google Plus Page


1. Write your post normally on your Blog and publish it.
2. After Publishing, go to Posts Tab placed on right top of your Posts Page.

G+ for Blogger

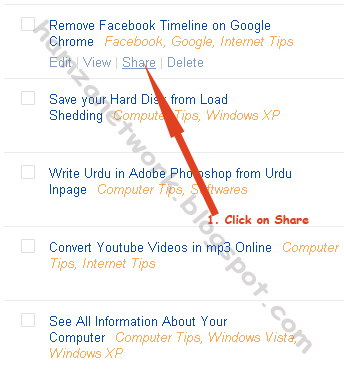
3. When you will Click on Posts then a Page of Posts Will open. Click share button placed under your  published post title. See the picture below.

Google Plus share picture

4. After clicking on Share button, a box of Google Plus will open. Set up your post settings according to your wish and click on Share.

Google plus sharing

5. Now you have done everything and your Blogger post has added to Google Plus page. You can check your Blogger Post by going on your Google Plus Profile. And next time Google Plus Share box will automatically come after publishing any post.

Remove Facebook Timeline on Google Chrome

08:32 Add Comment
Do you know that how to remove facebook Timeline? Many of us don,t know that how to remove facebook Timeline. So the answer is "No". Sometimes, many people says that their facebook profile has automatically changed into Timeline. Their are lot of things we talk about Timeline. It is fact that i hate Timeline and i am the one who can say that his Timeline has automatically added to his profile. There are very very few things to remove Timeline. Facebook don,t give any option to remove Timeline. I only know that how to remove it while browsing on Google Chrome.

Google Chrome gives us many facilities for such things. It has many Plugins, Extensions and Applications. All Applications are very useful and use in many problems.Below are some hints for removing Timeline.


Removing Timeline


1.Go to http://google.com.pk
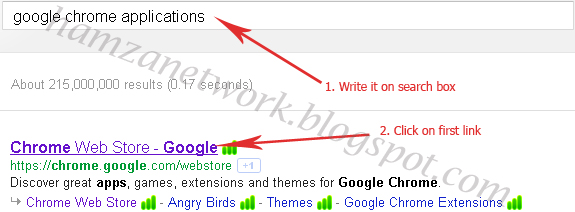
2.Type Google Chrome Applications in search box.
3.Click on First search result on Google


4.Write Timeline Remove in Chrome Web Store search box.


5.Then click on Add to Chrome at first Applications who,s name is Timeline Remove


6.When you will click on Add To Chrome then the application will automatically save in Google Chrome. If you will open any facebook profile then timeline will not be visible and profile will look simple.


Result


Before adding Extension, Hamza Network facebook profile look like below picture.


After adding Extension, Hamza Network the facebook profile look like below picture.


                                  Ask in comments if you have any problem about this topic.

Private Browsing in Firefox or Google Chrome

07:28 Add Comment


Are you want to make your browsing history private and disappear from others in Google chrome or Mozilla Firefox? When you open sites or browse on the web, Mozilla and Chrome save your browsing items in a special tab. You can easily find your browsing data and browsing cookies from special tab and others(Friends, Family and relatives) can also find them. Many peoples want to make their history hide and disappear from others. Sometimes, you have to open sites which have virus cookies or virus pop ups. Virus cookies are very dangerous for your computer and your operating system. Private Browsing is helpful to save your computer from any type of internet virus.
So if you want to make your web history private then follow the steps mentioned below .

For Google Chrome


? Open your chrome web browser.
? Click on small wrench icon placed on the top right of your browser.
? Click on New incognito window.


? When you will click on New incognito window, a new window will appear.
   Now browse the web on new window. Your browsing from new window will not save in history.


For Mozilla Firefox


? Open you Firefox browser.
? Click on Tools.
? Click on Start private browsing.


Now you have done all steps.

                         If you have any hesitation about this topic the comment below.

Translate any Sentence in any other Language using Google

21:03 Add Comment
Hi everyone, Today i will tell you how to Translate any sentence or word in any other language using Google.  Some peoples do not understood other languages so easily except their own. So this is helpful tutorial for those people who can not speak or write other languages. Benefits of translation are very useful in our everyday life.
Below are some easy steps to translate sentences or words using google.


Translate your Sentences


1. Go to http://www.translate.google.com.
2. Select your language source that you want to translate from From. See the picture below.
3. Select your targeted translation language from To. See the picture below.


                                                        Now you have done.
                    If you are facing any problem about this topic then comment me below.