Disable Facebook Notifications for Email

08:05 Add Comment
Facebook Email logo
Today i come here to tell you an article about facebook. Facebook is a largest social sharing website which has made by two brothers. There are many things in facebook which we like and there are also many thing which a man don,t like. When we join facebook and post on our wall then a notification have been send to our Email. We make our Email Id for our personal use and after joining facebook, when we open our email, there are many many notifications  which are caused to increase our tension. In this  tutorial, You will know that how to disable this type of  facebook notifications from our email. Here is a full article for knowing such a thing


Disable Facebook Notifications from Email


1. Login to your facebook account.
2. Go to Account Settings by clicking on Half Arrow icon.

Facebook Settings

 3. Click on Notifications. And then you can set your notifications according to your wish. You can disable email notifications by clicking on Message icon. See below picture for help.

Picture for fb settings

                             If you have any problem about above article then ask in comments.

Add Blogger Posts to Google Plus Page

23:30 Add Comment
This is my first article about Google Plus. We all know that Blogger is a very big platform for Blogging, We also know that there are many things to customize and popular our Blog which are designed by Google or any other developer. Google Plus is one of them which is cause to popular our Blog. G+ is very  useful thing for Bloggers and other site makers.Today i will tell you that how to add your Blogger Posts to Google Plus page. If you add your Blogger posts to G+ then your site ranking will be increased. Your friends will know much more about your Blog. Your Blogger posts will popular and more precious.


Add Blogger Posts to Google Plus Page


1. Write your post normally on your Blog and publish it.
2. After Publishing, go to Posts Tab placed on right top of your Posts Page.

G+ for Blogger

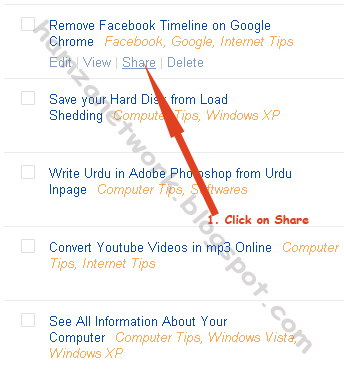
3. When you will Click on Posts then a Page of Posts Will open. Click share button placed under your  published post title. See the picture below.

Google Plus share picture

4. After clicking on Share button, a box of Google Plus will open. Set up your post settings according to your wish and click on Share.

Google plus sharing

5. Now you have done everything and your Blogger post has added to Google Plus page. You can check your Blogger Post by going on your Google Plus Profile. And next time Google Plus Share box will automatically come after publishing any post.

Remove Facebook Timeline on Google Chrome

08:32 Add Comment
Do you know that how to remove facebook Timeline? Many of us don,t know that how to remove facebook Timeline. So the answer is "No". Sometimes, many people says that their facebook profile has automatically changed into Timeline. Their are lot of things we talk about Timeline. It is fact that i hate Timeline and i am the one who can say that his Timeline has automatically added to his profile. There are very very few things to remove Timeline. Facebook don,t give any option to remove Timeline. I only know that how to remove it while browsing on Google Chrome.

Google Chrome gives us many facilities for such things. It has many Plugins, Extensions and Applications. All Applications are very useful and use in many problems.Below are some hints for removing Timeline.


Removing Timeline


1.Go to http://google.com.pk
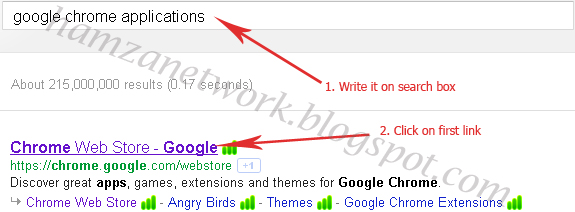
2.Type Google Chrome Applications in search box.
3.Click on First search result on Google


4.Write Timeline Remove in Chrome Web Store search box.


5.Then click on Add to Chrome at first Applications who,s name is Timeline Remove


6.When you will click on Add To Chrome then the application will automatically save in Google Chrome. If you will open any facebook profile then timeline will not be visible and profile will look simple.


Result


Before adding Extension, Hamza Network facebook profile look like below picture.


After adding Extension, Hamza Network the facebook profile look like below picture.


                                  Ask in comments if you have any problem about this topic.

Save your Hard Disk from Load Shedding

18:45 Add Comment
Hi everyone. Load Shedding is a very big problem in Pakistan. When we have been sitting on our computer and if light has gone, then we are full from anger because our Hard disk could be shocked. There is a very comprehensive solution for this problem. Read full article for knowing that how to save our hard disk without


Shutting Down. After doing below method, your hard disk will free from any danger.


Save your Hard Disk


1. Right Click on My Computer
2. Go to Properties
3. Go to Hardware--->Device Manger


4.Go to Disk Drivers and Double click on your Hard Disk name. My Hard Disk name is MAXTOR   6L040J2.


5.Then go to Policies and Unmark Enable Write caching on the disk


6.Now your Hard Disk has saved from any type of Electric shocks and dangers.It is not problem If you    don,t Shut Down your computer. Your Hard Disk has totally saved from any type of inconvenience.

                           Ask in comments if you have any hesitation about above article.

Write Urdu in Adobe Photoshop from Urdu Inpage

18:18 Add Comment
Hi everyone. Today i come here to teach you a very important article about Inpage. Inpage is a program that is used to compose Urdu in computer. It is a very comprehensive program for Pakistanis. People use this program for compose Urdu with all fonts and facilities. But the problem is that inpage only provide composing for Urdu. We can,t style our composing and can,t make shadows or different effects. We also can,t insert HD pictures in it. The need of hour is that how to fix it. People who love to write urdu in Inpgae are also like to give different effects and styles in urdu. We can,t do anything using Inpage. Adobe Photshop is a best solution for this problem
. I will tell you that how to write urdu in Adobe Phostoshop and create different styles and shadows in it. Below is a full tutorial for doing such a thing.


Write Urdu in Inpage


First of all you need to write Urdu in Inpage. I have wrote a lyric.


 After writing, Go to File--->Export Page.


When you will click on Export page, a box will appear. Click Browse on box. Use below picture  settings on your inpage.


Then Type your File name. Choose your Save Target and most important you have to choose  Encapsulated Postscript Files in Save as Type and then click on Save. I am telling you again that it is very  important step and nothing will be done without this.


When you will click on Save, a box will appear. Click ok in that box.


Adding Urdu in Photoshop


Open your Adobe Photoshop.
Go to File--->Open and open your Encapsulated Postscript File. I have saved my file with the name of Lyric.


When you will click on open, a box of Rasterize EPS format will open. Choose below picture settings and click on ok.


Now your Urdu composing has inserted to Adobe Photoshop. In Photoshop, Urdu will look like below picture.


You can make different styles, shadows and effects on your Urdu.


                                If you have any question about this topic then ask in comments. 

Convert Youtube Videos in mp3 Online

22:27 Add Comment
Salam to all my dear friends. I have come here to tell you an interesting article about Youtube. Today, you will know that how to convert Youtube videos easily in mp3. There are many ways to convert youtube videos in other formats but today i will tell that how to convert youtube videos online and download them in mp3. Converting videos after download is a problematic and difficult thing. We have to download a large file and then we convert it in any format but i will eradicate this problem and will tell you to download videos in mp3 after converting
. Below are some steps for converting Youtube videos online in mp3.

Convert Youtube Videos Online


 first of all, copy your youtube video link. I have copied Sami Yusuf Naat link.


 Then go to http://flvto.com
 Paste your youtube video link in Text box.


 Click on Convert to mp3.
?  Then Click on Download.
 You can also download Extension for converting youtube videos. Below is a simple link for Extension.
                                                http://flvto.com/ytflvtomp3.crx

                              If you have any problem about this topic then ask in comments.

See All Information About Your Computer

01:28 Add Comment
See All Information About Your Computer


Salam to everyone. Today i will tell you an important trick of Windows xp, Vista and Seven. There is no way of knowing all Hardware and Display issues in your Computer. We see our Ram or Page File by Right clicking on My Computer and then Properties. In this method, you don,t know about your Display Card, your Disk memory and many other things. You don,t know that what is Power of your Display card and what is quantity of your Secondary Storage Device like Hard Disk. But today i will told you that how to know all Hardware of your computer in all types of Windows.


Below are some steps for knowing everything about your Computer.


For Windows Vista or Seven


Go to Start.
Write Run in Search Box and click on Run.
Type DxDiag in Text Box.
You will see all Information related to your Pc.


For Windows Xp


Go to Start.
Click on Run.
Type DxDiag in Text Box.
Now you have done.


                    If you have any problem about this topic then tell me in comments.