Convert Youtube Videos in mp3 Online

22:27 Add Comment
Salam to all my dear friends. I have come here to tell you an interesting article about Youtube. Today, you will know that how to convert Youtube videos easily in mp3. There are many ways to convert youtube videos in other formats but today i will tell that how to convert youtube videos online and download them in mp3. Converting videos after download is a problematic and difficult thing. We have to download a large file and then we convert it in any format but i will eradicate this problem and will tell you to download videos in mp3 after converting
. Below are some steps for converting Youtube videos online in mp3.

Convert Youtube Videos Online


 first of all, copy your youtube video link. I have copied Sami Yusuf Naat link.


 Then go to http://flvto.com
 Paste your youtube video link in Text box.


 Click on Convert to mp3.
?  Then Click on Download.
 You can also download Extension for converting youtube videos. Below is a simple link for Extension.
                                                http://flvto.com/ytflvtomp3.crx

                              If you have any problem about this topic then ask in comments.

See All Information About Your Computer

01:28 Add Comment
See All Information About Your Computer


Salam to everyone. Today i will tell you an important trick of Windows xp, Vista and Seven. There is no way of knowing all Hardware and Display issues in your Computer. We see our Ram or Page File by Right clicking on My Computer and then Properties. In this method, you don,t know about your Display Card, your Disk memory and many other things. You don,t know that what is Power of your Display card and what is quantity of your Secondary Storage Device like Hard Disk. But today i will told you that how to know all Hardware of your computer in all types of Windows.


Below are some steps for knowing everything about your Computer.


For Windows Vista or Seven


Go to Start.
Write Run in Search Box and click on Run.
Type DxDiag in Text Box.
You will see all Information related to your Pc.


For Windows Xp


Go to Start.
Click on Run.
Type DxDiag in Text Box.
Now you have done.


                    If you have any problem about this topic then tell me in comments.

Private Browsing in Firefox or Google Chrome

07:28 Add Comment


Are you want to make your browsing history private and disappear from others in Google chrome or Mozilla Firefox? When you open sites or browse on the web, Mozilla and Chrome save your browsing items in a special tab. You can easily find your browsing data and browsing cookies from special tab and others(Friends, Family and relatives) can also find them. Many peoples want to make their history hide and disappear from others. Sometimes, you have to open sites which have virus cookies or virus pop ups. Virus cookies are very dangerous for your computer and your operating system. Private Browsing is helpful to save your computer from any type of internet virus.
So if you want to make your web history private then follow the steps mentioned below .

For Google Chrome


? Open your chrome web browser.
? Click on small wrench icon placed on the top right of your browser.
? Click on New incognito window.


? When you will click on New incognito window, a new window will appear.
   Now browse the web on new window. Your browsing from new window will not save in history.


For Mozilla Firefox


? Open you Firefox browser.
? Click on Tools.
? Click on Start private browsing.


Now you have done all steps.

                         If you have any hesitation about this topic the comment below.

Recent Post and Recent Comment Widget for Blogger

06:27 Add Comment
Salam to all my dear friends. Today i will tell you about an important widget of Blogger. Today you will know that how to add Recent Comments and Recent Post gadget in Blogger. Recent post and recent comment widget is used for tracking the visitors from latest comment or latest post. We also use this widget for our knowledge about latest Comments and latest Posts. Many people don,t know that how to add Recent post and Recent comment widget in Blogger or Website and today you will completely learn that how to add these widgets in your blog or Website.
Below are some important steps for adding widget to your Blog.

Add Recent post Widget in Blogger


? Login to Blogger.
? Go to Dashboard--->Layout
? On your page elements where you want to add your Widget click on Add Gadget and choose Feed then
   Enter the following link:
 http://YOURBLOGNAME.blogspot.com/feeds/posts/default

After click on Continue, Set Recent Post as your Feed title.


Add Recent Comments Widget in Blogger


? Login to Blogger.
? Go to Dashboard--->Layout
? On your page elements where you want to add your Widget click on Add Gadget and choose Feed then  
   Enter the following link:
 http://YOURBLOGNAME.blogspot.com/feeds/comments/default


? After click on Continue, Set Recent Comments as your Feed title.

                   If you have any problem about this article then ask me in comments.

Add Facebook Like and Send Buttons Under Posts in Blogger

05:05 Add Comment
Hello everybody! Today i will tell you about Facebook Like and Send button. I will also tell you that how to add Facebook Like and Send buttons to your Blog only under posts. Facebook as a way to "give positive feedback and connect with things you care about," users can "like" status updates, comments, photos, and links posted by their friends, as well as adverts, by clicking the "Like" button at the bottom of the content. This makes the content appear in their friends' News feeds.
The "Like Button" is also available for use on websites outside Facebook: "When the user clicks the Like button on a site, a story appears in the user's friends' News Feed with a link back to the website
." At the same time when any visitor, including non Facebook members and logged out users, visit a site with the Like Button, their presence on the site is recorded by Facebook. Now i will teach you that How to add Like and Send buttons below post titles under the posts. Below are some steps for doing that.

Warning :Before you apply any changes in your Blog template, I encourage you to backup your Template by clicking Download Full Template 


Adding buttons to your Blog


   Login to Blogger account.
   Go to Dashboard--->Design--->Edit Html.
   Check Expand Widegets Elements.
   Now find below code.

       <data:post.body/>

  Paste the following code Before it

 <!-- Facebook Like+Send button Start HamzaNetwork --> <script src='http://connect.facebook.net/en_US/all.js#xfbml=1' type='text/javascript'/><fb:like action='like'     colorscheme='light' expr:href='data:post.url' font='' layout='button_count' send='true' show_faces='false'     width='450'/>             <!-- Facebook Like+Send button End HamzaNetwork -->

   After pasting this code, Facebook Like and Send button will appear under the post titles on the Home page of your blog. If you want to keep Buttons on First or Home page then click on Save template.


Appear buttons only under posts


  � If you want to make the buttons only appear inside your posts and not on your blog pages,
  put the following codes above and after the button codes.

        <b:if cond='data:blog.pageType == &quot;item&quot;'>
                    Button code Here
         </b:if>    

 Now you have Done.


Change Like to Recommended


� Find the following part in button code.


  action='like'

 � Change it to

  action='Recommended'  


Hide who Liked and Show only the Numbers of Likes


� Find the following part in button code.

 layout='Standard'

� Change it with

 layout='button_count'


Change Style of buttons


 � If you want to change style from light to dark then find the following code

 colorscheme='light
 � Change it with
  colorscheme='dark

   Now you have done all customization. If you want to ask anything about this Topic then ask in comments.

Boost your Windows Xp

18:39 Add Comment
Salam to everyone.Is your XP-running computer too slow to be of much use or frustrating? It may not be your computer's fault. Windows XP, when used correctly, could be fast, efficient, and fun to use. Here's how to speed up your XP system.  There are many ways to speed up your windows XP and today i will told you all ways. Many people also know many tricks but Below tips are very important to run your windows XP faster, smoother and reliable.
When we start our Windows XP machine, many errors and faults start with our programs which are main cause of Low speed of our computer. Below are some important and useful steps for running your XP machine faster.


1. Setup XP boot time


   ?  Go to Start button
   ?  Click on Run
   ?  Type Msconfig  in Text box
   ?  Click on BOOT.INI
   ?  Set Timeout from 30 to 3 Seconds.
   ?  Click Ok


After doing this method your Windows XP will Boot faster.


2. Disable Index services


  Go to Control panel
  Open Add or Remove programs
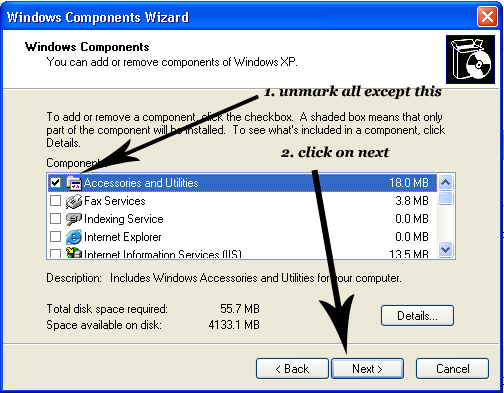
  Click on Add/Remove Windows components button.
   
  When you will  click on Add/Remove Windows components, a box will appear.
  Uncheck all Components except Accessories and Utilities
  Click Next
 
    Now you have Done.


3. Uncheck Automatic Folder Searching


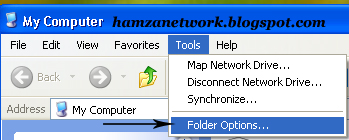
   Open My Computer 
   Click Tools 
   Click Folder option
   
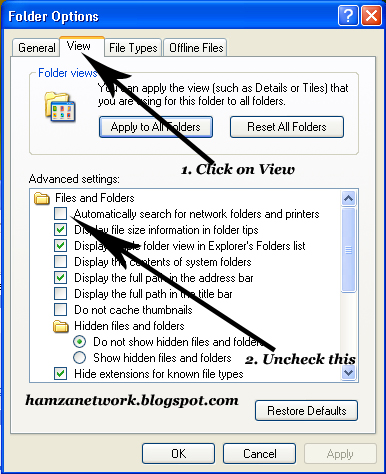
    When you will click on Folder option, a box will appear.
    In box click on View
    Uncheck Automatically search for network folders and printers and Click Ok.


4. Disable Graphic Properties


  Right Click on My Computer
  Click Properties
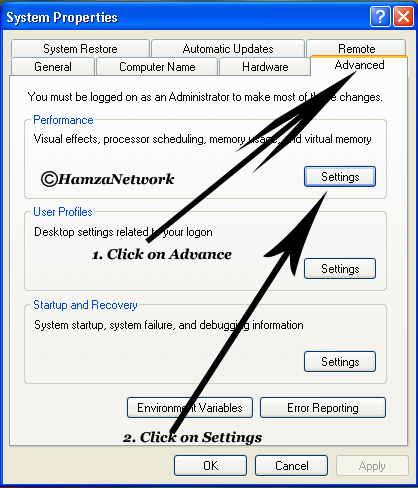
  Click on Advance Tab
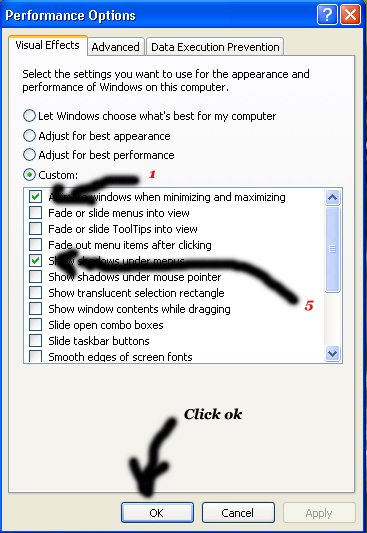
  In Performance Section, Click on Settings


  When you will click on Settings, a box will appear.
  On Visual Effects section, Click on Custom and uncheck all Effects except 1,5,14,15,16 Effects
  Click Ok


   Done.


5. Turning off System Restore


 Now Go to My Computer properties.
 Click on System Restore and check Turn off System Restore on All Drivers
 Click Ok


6. Turning Off Automatic Updates


 Open My Computer Properties
 Click on Automatic Updates
 Check Turn off Automatic Updates and Click ok.


7. Turning off Firewall


 Go to Control Panel
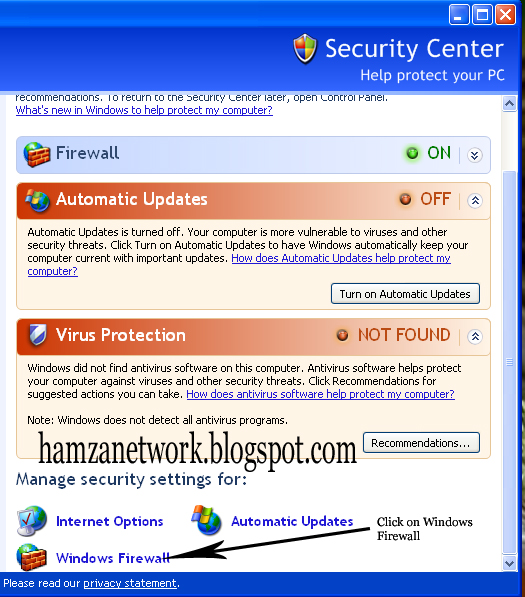
 Click on Windows Security Center
 Click on Windows Firewall Placed on Bottom Middle In box

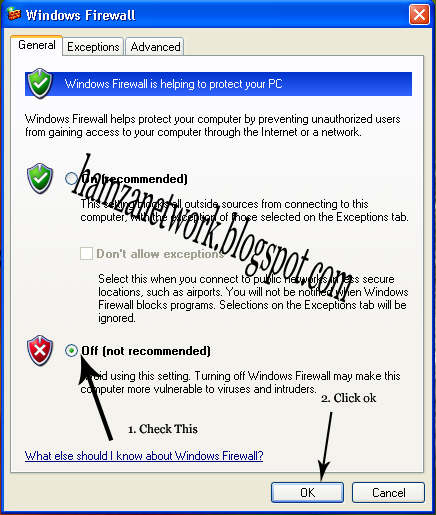
 When you will click on Windows Firewall, A box will appear.
 Check Off (not recommended) and Click Ok.


Restart your Computer to Apply all Changes.
?  Visit my facebook fan page for more Tips. http://facebook.com/HamzaNetwork 
 
        If You have any problem about this topic or ask anything from me then comment below.

Download Torrents Directly from Idm with Torrific

04:51 Add Comment
Hello everyone, Today i will tell you a very important Trick that How to download torrent files directly from Idm or any other Downloading platform Free.Trick is very useful for you. A torrent file stores metadata used for BitTorrent. It is defined in the BitTorrent specification. Simply, a torrent is data about a target file, through it contains no information about the content of the file. The only data that the torrent holds is information about the location of different pieces of the target file. Torrents work by dividing the target file into small information chunks, found on an unlimited number of different hosts. Through this method, torrents are able to download large files quickly. When a client (the recipient of a target file) has initiated a torrent download, the chunks of target file that are needed can be found easily, based on the data from the torrent itself
. Once all the chunks are downloaded the client can assemble them into a usable form. Now i will told you that how to download torrents from Idm or any other Download Manager. Below are some steps for this method.


Downloading Torrents From Idm


1. first you will have to copy the torrent URL which you are choosing to download. I am copying GTA Vice City Torrent url for your help. See the picture below.

2. Now Go to www.torrific.com and Login or signup.
3. Now paste you Torrent URL in Torrific Text box and click Get. When you will click on Get button Torrific will ask you to Compress your torrent, Click on Initiate Bittorrent. After this a Box of Torrent files will appear Like Below picture.
you will have to click on one link which have not Tick Mark like 2nd or 7th link in above picture. When you will Click that link, a box from IDM or other download manager will appear. Now download your file and enjoy.

                         If you have any problem about this topic the disscuss in comments.